Google+

Advent Week 4: Love


Before I begin this post's content, I want to share that I just updated my Winter Solstice post with the best book to read!! We did not receive it from the library before the original post. The addition is towards the end of the post. Now onto our Advent post.


This is the fourth week of Advent. We light our final purple candle. As you light each candle you remember how Jesus brought us hope, peace, joy and now love. Some Advent wreaths have a white candle in the middle. This candle is for Christ and is lit either Christmas Eve or Christmas Day. Now love is such an important theme. There are so many Bible scriptures you can think of to go with love..."...The greatest of these is love." 1 Corinthians 13:13. We included God Gave Us Love by Lisa Tawn Bergren in our books to read today. I feel this is a perfect book to read to explain the theme.


For those that do not know this series of books, Little Cub learns about God from different people in her family. In this one, she is with her grandfather. They talk about how God wants us to love everyone. They also talk about how there are different kinds of love and the greatest love comes from God. And yes, they mention God sending is only Son to us. 


When we did our clay ornaments last week, we also made some love ones.  We used love rubber stamps to get the words on them. 


The other craft is to make heart ornaments from pipe cleaners and tri-beads. They are very easy. Put the beads in whatever pattern (or no pattern) onto the pipe cleaner. Then bend and twist the ends of the pipe cleaner to make a heart. Now you can add a ribbon or just hang it as we did.

Update on our Advent Calendar Crafts:

Donkey Ornament


Hazel was working on the wisemen today. I did the camel with the wisemen while she made the wisemen. I also glued the stable together for her. I like how they are coming out and think she is doing a wonderful job. We added some white wool to the sheep and the shepherds. Hazel decided the wisemen needed gold and silver and used glitter glue. She has been really enjoying this year's Advent calendar. 

How did you celebrate Advent this year?

For more on our Advent:

Sharing Saturday 13-49


Thank you to everyone who shared last week and who visited the amazing ideas shared! If you have not had a chance to check them out yet, you really should. This week's party will last for two weeks. I have heard chatter of many taking a break between Christmas and New Year's Day. I will be doing features both weeks, so keep sharing!! We will not be taking a break, so I hope you will come check out Crafty Moms Share all week for lots of great ideas and a product review.

Fruit Christmas Trees


Need something to bring to a Christmas party, but want to make sure there is something not fattening and nutritious? Check out what I have done the past two nights for Hazel to bring to her school Christmas parties. My inspiration came from Pinterest. The original source of the pin is Ginger & Garlic: Edible Christmas Fruit Tree. These are relatively easy, but a  bit time consuming. They are made with a styrofoam cone and lots of toothpicks. I worked from the bottom up and you want to make sure you have plenty of green fruit to make it look like a Christmas tree. I definitely improved on my second one. 

First One
On the first one I tried to use larger star cookie cutters with the honeydew melons to make it look like a pine tree. It did not work well. I used my miniature cookie cutters to cut different shapes out to decorate the tree. I used my angel, gingerbread boy and girl and star on the first one. The fruit I used is green and red grapes, kiwi, honeydew, cantaloupe, watermelon, strawberries, raspberries and a star fruit (for the top). I wish I had splurged on the blueberries instead of the on sale raspberries. Oh, well. As I went on, I began to line the cone with the kiwi. On the second one this is the first thing I did.


Second One

On the second one I also added some pineapple. I also tried the Pop Chef that I have seen advertised on television. I thought it might work well for Hazel to make the tree with me. She was too tired after her Christmas Concert to make it with me yesterday afternoon, so I was on my own. I liked my metal cookie cutters better since I had more variety, but did like the little hearts it made. 

Second Tree

Anyway, I think these are the cutest things to bring to a party. They took me under 90 minutes each. I know my mother is thinking of making one to have out on Christmas Day. 

First Tree
Enjoy!! I hope you will stop by for Sharing Saturday later!


Winter Solstice


On Saturday winter begins where we live although with the weather this week, I think winter is already here. We have had two snowstorms since Saturday. Hazel has made her first snowman of the season! However the snow was a bit icy to make snow angels at least in the first storm. The second one she has not gotten to play as much since she got sick (after playing in the first snowstorm). We have been talking about the shorter days. Of course Hazel is trying to figure out what that means--are there less hours in the day?


Picture of Our Back Yard This Afternoon
To get ready for the first official day  of winter, I thought we would read some winter books and try a few crafts. After reading some winter books, Hazel decided we needed to make some paper snowflakes. This is one of her favorite things to do.


Then we read some more books. We went to the library and found a huge selection of winter books and here are some we got as well as some of our favorites from our own collection.


Although I keep explaining about there being less sunlight on the winter solstice, I am not sure Hazel gets the concept yet. I hoped some of these books would help her. The first two books in this collection are about multiple seasons. The third, Winter is the Warmest Season by Lauren Stringer may sound confusing, however the story is told by a boy who explains how his world becomes warm (for example, hot chocolate instead of cold milk, pajamas with feet) because of the cold temperature outside.


We also had to look at some books about snow. After all that is the best and the worst part of winter.  Red Sled by Rita Judge and The Snowy Day by Ezra Jack Keats are two of our favorite snowy/winter books.


Three of these books have activities and/or crafts in them. The top two are just about crafts and activities. It's Winter by Linda Glaser has some winter activities and explorations to do at the end of the story. It goes through what the animals are doing while it is cold outside. In the Seasonal Crafts series, Winter by Gillian Chapman has crafts for many holidays and events. The craft we decided to do was make construction paper finger puppets to go with stories that the Inuit women tell on winter nights to pass the time.


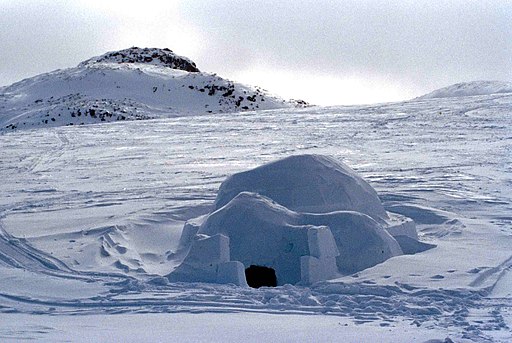
Now the Inuit people live in the Arctic. As we can imagine their winter days are long and dark.  To pass time they shared stories. Many were about the animals they lived with and ate: the caribou, the walrus and seals. Then of course there are stories about the sun, moon and the Aurora Borealis. The Inuit traditionally lived in igloos in the winter.


Iglu 1 1999-04-02
Source: By Ansgar Walk (photo taken by Ansgar Walk) [CC-BY-SA-2.5], via Wikimedia Commons
 How would you like to live in here for the winter?

Addition on the Winter Solstice: We read the best book for the winter solstice tonight. It is The Winter Solstice by Ellen Jackson. It goes through history on how the winter solstice was celebrated as well as giving an experiment to try to understand the seasons. I highly recommend checking this one out!!


Looking for more winter ideas check out:
Winter Solstice
Let It Snow! Winter Wonderland Tea Party
A Wonderful Winter Book: Red Sled
My Winter Pinterest Board

Glass Ball Christmas Ornaments--Ideas from Pinterest


I had a pack of six clear glass ball ornaments that I bought at some point. Before Hazel, I would make beach ornaments with sand and a few small rocks and shells to remember a trip to the beach, so I am guessing that is what I bought them for. I saw on Pinterest ages ago the melted crayon ornaments. I have no idea where I originally saw it since I can't find the pin, but here is one tutorial on Meet the Dubiens: Melted Crayon Ornaments. (I know this is not the tutorial I first saw since I remember the one I read saying to use low heat.) Now I have been saving some crayons--the ones from restaurants. I always keep a set in my purse just in case, however we go out enough that we have quite the collection of them. I wanted to try this, so I pulled these out the other day while Hazel was home sick. She became interested in it right away (even with the hair dryer that scares her. 


The idea is simple. Put pieces of the crayons in the glass ornament. Use the hair dryer to heat and melt the crayons and swirl them around as they melt. Have some oven mitts or thermal gloves handy, because your hands will get hot as does the ornament. I left the leftover pieces in there, but for the most part they melted completely.


A friend at church recently told me about the second kind of ornaments we made. You use Pledge floor cleaner and glitter. I did not have Pledge floor cleaner, but experimented with the ones I had. The pin my friend has was only a picture tutorial, so I googled it and found this one at The Ornament Girl. I am wishing I had read the tutorial first. I did not dump out the excess cleaner and now a couple of them seem to have a blob of glitter in them, but they still look pretty and Hazel LOVED making them.


We got creative with mixing the colors of glitter. The first one we did was a multicolor glitter, but after that it was Hazel choosing what to mix. She has asked me to buy more glass balls to make more of both types of ornaments. I am thinking maybe Christmas presents for next year. What do you think? Have you made anything that you saw at Pinterest yet? 

For more Christmas ornament ideas check out my Christmas Craft Round-up and my Christmas Pinterest Board.