Google+
Showing posts sorted by relevance for query dough. Sort by date Show all posts

Play Date with Play Dough

So today (Wednesday) I had scheduled a play date for Hazel with a very shy boy that will be in her nursery class next fall. His mother and I wanted to get the kids together so they would have a friendly face the first day they go to school since it will be the first time we are leaving them at school without us. (We both were in different parent/child classes at the school this year.)  I also took the Play Dough Pledge this week.


nurturestore


I figured I would combine the two so the kids would have an activity to do while getting comfortable with one another. (Note: All of  the recipes I used this time came from Playdoughrecipe.org.) I made two different types of Jello play dough (peach and lemon) and put them in the refrigerator. I added lavender and sprinkles to the lemon for more scent and texture. Then I made a rubbery play dough and cloud dough. This morning Hazel and I made an oatmeal play dough. Then once our play date got here, we made two types of classic play dough with a little experiment of adding juice concentrate to color and scent it. I had some grape juice and raspberry cranberry juice that I used to dye fabrics yesterday and saved some for the play dough. We ended up adding quite a bit more flour to make it a good consistency with the extra liquid from the juice.

Making the Oatmeal Play Dough:
The recipe seems very easy and it really is, but we adjusted it to get a dough we liked. The recipe calls for 1 cup of flour, 2 cups of oatmeal, and 1 cup of water. Then there are suggestions of using corn meal or coffee grounds to make it less sticky. We chose corn meal since I don't really like the smell of coffee and didn't want it on my hands. I also added more oatmeal to give it more texture.

Next we brought her small table and chairs from the craft room up to the kitchen where it is more comfortable and a bit cleaner. We also brought up all of her play dough tools and got some cars, plastic animals, sand castle tools and baking dishes and some glitter so everything would be ready to play with. Then I measured out the flour, salt and cream of tartar for the classic recipes and left them in measuring cups and bowls waiting for the kids to pour and mix. I also measured the water and put it in my electric kettle so I could get it boiling.

By this time, Hazel could not wait for them to get here. She is actually drumming on the tupperware containers that hold the Jello play doughs. She was dancing/skipping all over the place.

When her new friend and his mom arrived, we made the classic recipes. (I thought this freshly made and still warm would also add a nice contrast to the ones that had been in the refrigerator.) Then they started to create and play. They seemed to have fun. Hazel wanted to make cookies and fill the cookie sheet as well as two muffin containers.
Hazel's cupcake
Her friend started with the rolling pins (the textured ones), cookie cutters and dough cutters.  Then he liked the glitter.
Pink Cow
Both using cookie cutters
Star cookie cutter and rolled play dough
While Hazel worked on her cupcakes and cookies her friend made a pan of muffins. He put glitter on the bottom so they fell out when he tipped then over.
His Muffins (The front one on the left is the oatmeal play dough)

The Cookie Sheet (mostly Hazel's but a bit from all of us)
The kids did not seem to get into the cloud dough too much. Hazel's friend used it to decorate his cupcake/muffins like it was cheese (or at least that is what it looked like), but otherwise they didn't really touch it. I think I'll see if Hazel will play with it later with me or tomorrow. They had the most fun just adding glitter to everything!

So will you join us by taking the play dough pledge?


Play Dough Day 2 And Mixing Colors with Ice


nurturestore

This morning when we got up, Hazel asked to play with her play dough again (click here to see yesterday or day one of our play dough pledge play). I had put most of it in the refrigerator since I knew the Jello play dough had to be kept in it. I had left the cloud dough out. The oatmeal play dough was hard to work with after being in the refrigerator. It may be because I made it a bit dry since I didn't want it to be so sticky. First we played with the cloud dough. (I think I could have used more oil in this recipe.)

Sick Day Crafts

Today I wanted to call in sick, but as a stay-at-home mother there is no calling in sick, so we stormed on. To fill our time, I thought we could make some salt dough ornaments. I saw Amy's post over at One Artsy Mama yesterday with their creations and since there are so many steps it would fill the day. So this morning we mixed the dough. I had printed out Amy's post so I would be sure to do it correctly and learn from her mistakes. Hazel wanted to pour all the water in at once, but I explained that it wouldn't work that way (Thanks, Amy!). Then the dough had to sit for 40 minutes.


So we did some other crafts. I finished our TP roll pilgrims and Native Americans.  I used felt for their hats and the hair for the Native Americans. I added some feathers on the male. They could use some faces, but I didn't bother with that yet. Not that it really matters much since we canceled our Thanksgiving celebration.

I called my parents today and told them I think it is best that they don't come for Thanksgiving. As disappointing as that is, I know it is the right thing for all of us. I would feel horrible if I got them sick and we still don't know if we were exposed enough to the stomach bug going around and certainly don't want to pass that on. We will still have turkey and a few fixings (assuming we don't have the stomach bug) since I already bought the turkey breast, but it will be just the three of us. Perhaps, Steve's mother will come over for dessert, but we will see.

The other craft we worked on was making a gum drop topiary. Since Mommy is sick we had to use supplies we had on hand. I had a few small Styrofoam balls, gum drops, tooth picks and a paper cup. After starting out we decided to put more than one gum drop on a toothpick (since they were rather long). I had to play with what would hold it up. I finally threw in some of our homemade play dough--cranberry and gingerbread. Hopefully it will hold it as it dries as well.

The other thing we did to fill the time was write the postcard for Hazel's new friend in Australia. Kelly over at Happy Whimsical Hearts contacted me to see if Hazel would like to exchange postcards with her three-year-old son, Dexter. We of course loved the idea and are hoping it will turn into a great friendship/pen pal exchange. We went the other day to buy a postcard. Hazel liked several so we bought three of them. I also bought three stamps for them so we can mail all three over time. So I asked Hazel what she wanted to write on the postcard today and wrote it. Then she drew a little on it after I explained where she could write and where she couldn't on a postcard. Then I ran out and stuck it in the mail, so hopefully Dexter will get it soon. We chose to send the Massachusetts postcard with a nice fall tree on it since that is basically what we are seeing right now here.

Then we rolled out and cut out the salt dough ornaments. We ended up with 22 ornaments. We baked them and had some lunch. Then we read some stories and tried to take a nap. Ok, Mommy took a nap and Hazel did not. Then I called Steve who called his mother and she said she would take Hazel so I could sleep. I dropped her off there and slept all afternoon. It was wonderful. Fluffy curled up with me in bed and slept. The only time we woke up was when my friend called to tell me the gender of her baby that she is carrying. After that phone call I fell right back asleep and slept until I heard Hazel and Steve come home. Boy, did I need that this afternoon.

Since Hazel was at Nonni's for the afternoon, we did not finish the salt dough ornaments. So tomorrow we will paint them! I will have pictures of them tomorrow for you.

So the other realization I had today is that Hazel's birthday is only a little over a month away. I better get going on all the birthday party crafts I have been planning and putting off. So mixed in with my Christmas crafts you will see lots of nursery rhyme crafts.

Hope your day is going well.

Around the World in 12 Dishes: Exploring Ukraine through Food and Craft

With Ukraine in the news so much, it is a perfect time to explore the country through food, books and crafts. It is also a perfect time for lessons with older children about current events and such. Since we do not let Hazel know about current events or watch the news, we looked at tradition, food and crafts. 


Ukraine is a country in Eastern Europe and is the largest country that is entirely in Europe. For more information, read the introduction post at Around the World in 12 Dishes. I shared the books we have read and not read about Ukraine. Have you read Jan Brett's The Mitten? I know it is really popular around here and it is the retelling of a Ukrainian folktale.

 We decided to try two different Ukrainian recipes. The first we found in the Ukraine book of the Festivals of the World series.  It is written by Volodymyer Bassis (or Vladimir Bassis--all the sites seem to list both spellings). The recipe is for Strawberry Kysil. Kysil can be made with different berries, but Bassis claims strawberries make the best one.

Strawberry Kysil 
(from Ukraine by Volodymyer Bassis)
Ingredients:
2 quarts of fresh strawberries (I am sure you could use frozen)
2 cups cold water
3/4 cup sugar
1 tablespoon potato starch (we used tapioca starch since we could not find potato starch)

1) Wash and hull the strawberries. Put in pan with water and bring water to a boil. Boil on high for a minute then turn down to low and let simmer for 10-15 minutes. I let Hazel use the potato masher while the strawberries cooked to help get the juice out. This makes the next step a bit easier.

2) Push the strawberries through a fine mesh strainer with a wooden spoon. Put juice back in pan.

3) Stir in sugar and bring back to a boil. Boil over high heat for 2 minutes.

4) Reduce heat to medium and stir in starch and dissolve it (Hazel did not do a good job of dissolving our starch so we have chunks in it). Cook for another 2 to 3 minutes stirring until it thickens. 

5) Cool to lukewarm and then put in refrigerator to get cold for a few hours. Enjoy!


Strawberry Kysil is a bit like strawberry soup or eating a liquid form of strawberry jelly. It is delicious but you will not want to much at one time.

Our second recipe came from Ukrainian Classic Kitchen and International Cuisine and it is Ukrainian Yabluchnyy Korzh. Hazel likes to call it what it tastes like--apple pie. It is a type of cookie crust with apples inside. It is delicious!

Ukrainian Yabluchnyy Korzh
Adapted from Ukrainian Classic Kitchen and International Cuisine
Ingredients
Dough:
5 cups of flour
1 teaspoon baking powder
3/4 teaspoon salt
1 cup sugar
1 cup unsalted butter, cut into small pieces
6 large egg yolks (if I made again I would use whole eggs)
1 cup sour cream

Filling:
7-8 large apples (we used Granny Smith)
1/2 cup sugar
1 teaspoon ground cinnamon

Start by making the dough:
1) Stir together flour, baking powder, salt, and sugar. then add the butter and mix with your hands (Hazel loved this part) to make a coarse flaky mixture. 

2) In a small bowl mix egg yolks and sour cream together. Then add it to the dry ingredients. Work it with your hands into a firm, smooth, not sticky dough. (Ours never really formed a good firm smooth dough.)

3) Divide dough into 2 pieces, making one slightly larger than the other. 

4) Turn oven on to 375 and grease with butter (we used the wrappers) a 13 x 9 x 2 baking pan. Do not use baking spray to grease.

5) With the larger dough, cover bottom and sides of pan. The instructions say to roll it out, but I found ours was just too crumbly to do this. I pressed it into the pan.

6) Time to start filling. Peel and thinly slice the apples (we used our food processor). Mix with sugar and cinnamon.

7) Add apple mixture to bottom crust.

8) Roll out top crust or pat it on top. Try to seal apples in.

9) Bake for 45 to 55 minutes. It should be brown in color and the apples should be tender to a knife. Set on wire rack to cool for 20 minutes.

10) Now you can attempt to remove the pan (I did not attempt due to the crumbly nature). To remove: Run a sharp knife along the sides and then put a wire rack on top and flip it over. Remove pan and put other wire rack on bottom and flip back the correct way.

11) Serve at room temperature. You can dust it with powdered sugar (we didn't bother). Refrigerate leftovers but bring to room temperature before eating.


Since it tastes similar to apple pie (Steve's favorite dessert), we all love it!

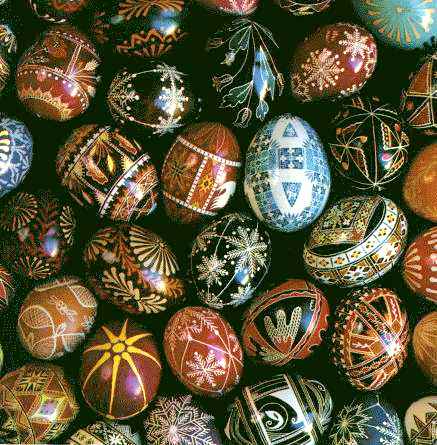
We also have been reading Urkainian stories. We found a Cinderella tale, The Golden Slipper, which we shared last week. We also found many versions of a Christmas tale involving spiders. All the crafts I could find had to do with spiders as Christmas ornaments or pysanky (Ukrainian Easter eggs).
Ukrainskie pisanki
Pysanky Source: By Carl Fleischhauer (Library of Congress employee[1]) 
(http://www.loc.gov/folklife/cwc/) [Public domain], via Wikimedia Commons
Since we already posted about pysanky, we made a silver spider web and spider Christmas ornament. We found the instructions in Christmas Crafts from Around the World by Judy Ann Sadler. 


In the Christmas legend, the spider on a Christmas tree spins webs of silver for a poor family who has no money for Christmas. Thus why the ornament is done in silver!
Ukraine's Flag
Now it is time for the Around the World in 12 Dishes Blog Hop! Please visit the other posts and feel free to share any Ukrainian crafts, food, etc. posts that you have done.


Sharing Saturday #39


Wow, I had a very hard time choosing features this week. There were so many wonderful ideas shared last week!! If you have not had a chance to check them all out, please go do so and leave some comment love (you know we all love getting comments)!


Ok, I loved these toadstools over at Happy Whimsical Hearts. Apparently I wasn't the only one!!

These week themes seemed to come in pairs, so here are some pairs I saw.
Banana Theme
Bottom From Hey Mommy, Chocolate Milk: Monkey Loves Bananas (Lots of neat ideas!)
Lavender Theme
Bottom From Adventures at Home with Mum: Lavender Rice Mini Zen Garden (A chill out area instead of a time-out--Love it!!)
Play Dough Theme
Bottom From Play Through The Day: Cinnamon Spice Play Dough (Oh, how we love scented play dough!)
Pirate Theme (in honor of talk like a pirate day)
Top From We-Made-That: Pirate Flag (I love the bow on the skull!!)
A Very Hungry Caterpillar Theme
4) From Art Mama Says: Duck Puppet (Ok, how could I not feature this one for Hazel?)
5) From Creative Connections for Kids: Melting Crayons (Ok, I know we have seen this many times, but she adds a fun twist!!)
6) From Happiest Mom on the Blog: Dancing Raisins (Such a neat experiment!)


Thank you to everyone who shared last week!! I hope you will join us and share again!! If you are featured here, please feel free to grab a featured button to display proudly on your blog.
Photobucket


Button Code:


From Your Hostess:
Preparing for Michaelmas: Inner Dragons (including an original story) and Harvest


Now for This Week's Party   
A Few Simple Guidelines:
1)  Please follow both hosts via GFC (or one of the other ways that work for you).  

Hosts are Crafty Moms Share and Mama Mia's Heart2Heart. A reminder: Mia is taking a blogging break. Hopefully she will be back soon to host again!!

2)  Link any kid-friendly, child-centered post. Please no etsy shops or giveaways, etc.  Remember to link to your actual post.
3) Post the button on your sidebar or somewhere on your blog to help spread the word.

Photobucket

4. Optional: Like us on Facebook and Google+
Disclaimer: By sharing here, you are giving Crafty Moms Share and Mama Mia's Heart2Heart permission to use your photos for features and to pin your craft at Pinterest
All right everyone...This is a PARTY!! Have Fun!!

Happy Family Times #2

Thank you to everyone who shared with us their wonderful family experiences last week. If you missed it, go check them out here. Or visit our Pinterest Board for Happy Family Times where we pin some of our favorites. I know I find it so inspiring to see how we are all spending our quality time with those we love most.

Around the World in 12 Dishes: Portugal

This month we are exploring Portugal for Around the World in 12 Dishes. I wrote an introduction to Portugal there, so I am going to get into how we explored the country. As always we took some books out of the library. Our favorites for Hazel getting understanding are:
  • Portugal by Kari Schuetz - an easy to understand overview of the country and culture


  • A New Life in an Old Village by Hélène Tremblay - one family's story about life in a Portugal village

  • The Little Horse of Seven Colors and Other Portuguese Folk Tales Retold by Patricia Tracy Lowe - folk tales with a few illustrations

I also spoke to a friend who is Portuguese American. She suggested making caldo verde and Portuguese sweet bread. Of course her memories of her grandmother making them did not include an actual recipe--more of take this and that and a little of this, so I looked for some recipes. For the caldo verde (green soup) we found a recipe in Jean Anderson's The Food of Portugal. Now I knew this was taking a chance since both Steve and Hazel do not like kale. There is discussion on line whether the greens should be kale or collard greens. Since I like kale better and have had the soup in a restaurant in an area with large Portuguese American population and it said kale and potato soup, I went for kale. Sometimes Steve will eat it in things, so I figured why not. I dragged a sick Hazel out to the store and of course everyone was shopping for Easter that morning. Ugh! So much for a quick trip. An employee in the meat department helped me pick out sausage since I don't like it usually. Hazel thought it was too bland, but did not tell me this until a few days later. She just didn't eat it. I thought it could use more salt (and I do not usually cook with salt at all and never add it) and did not like the sausage and Steve just didn't like it.

Green Soup or Caldo Verde
1 large yellow onion
1 large garlic clove
4 tablespoons olive oil
6 large Eastern potatoes
2 quarts cold water
6 ounces chourico, chorizo, pepperoni
2 1/2 teaspoons salt (do not cut this down!! I did and it was a mistake)
1/4 teaspoon freshly ground pepper
1 pound collards or kale

Finely chop the onion, garlic, potatoes and  kale. Thinly slice the sausage. Saute the onion in the garlic in 3 tablespoons of oil in a large heavy saucepan for 2 to 3 minutes. Add the potatoes and saute stirring constantly for 2 to 3 minutes until they begin to color. Add water and cover the pot. Boil gently over medium heat for 20 to 25 minutes until the potatoes are mushy.

Meanwhile fry the sausage in a heavy skillet over low heat for 10 to 12 minutes until most of the fat is out. Drain well and reserve.

When the potatoes are mushy, remove pan from heat and with a potato masher, mash potatoes in pan with soup mixture. Add the sausage, salt and pepper and return to heat. Cover and simmer 5 minutes. Add the greens and simmer uncovered 5 minutes until greens are tender and the color of jade. Mix in remaining tablespoon of oil and taste the soup to see if it needs more salt or pepper (I did not do this and it was a mistake).

For the Portuguese Sweet Bread, I decided to try a recipe on-line instead of the one in the book. I found many recipes on-line and many of them were the same and had lard--since I didn't have lard, I looked for a recipe without it and found this one on Cooking with Elise: Massa Sovada Traditional Portuguese Sweet Bread. I cut the recipe in half and we tried to make it with Easter eggs instead of brown eggs. I definitely did not add enough flour for the recipe. As a result our eggs slid out of the bread and we had issues.

Massa Sovada or Portuguese Sweet Bread (adapted from Cooking With Elise)
5 cups of flour
1 1/2 tablespoons of active dry yeast and 1/2 teaspoon sugar
5 large eggs at room temperature (take out at least 2 hours ahead)
1/2 cup unsalted butter
1 teaspoon canola oil
1/2 cup almond milk
1/2 teaspoon salt (just a pinch if you use salted butter)
1 1/8 cup sugar
zest of half lemon (I used more an it was very lemony)
egg wash (one egg and a splash of milk)
3 Easter eggs or brown eggs

In bowl dissolve your yeast in 1/2 cup of water with the 1/2 teaspoon of sugar. Allow your yeast to proof.

Beat the eggs until they are light and fluffy. Add your yeast mixture and just enough flour to make a batter (1 cup at most). Cover with a dish cloth until bubbles form (we added too much flour and did not really get bubbles). Meanwhile melt the butter over low heat. Add the canola oil. When all the butter is melted add the milk, salt and lemon zest.

When batter has formed bubbles add the sugar and butter mixture. Add the remaining flour one cup at a time mixing well each time. This is a sticky dough. When it becomes difficult to stir (if you are not using a mixer) add the remaining flour by kneading it in until the dough is smooth and not too sticky. (Since we used our mixer, we let the mixer do the kneading and our dough was too sticky. I should have added more flour.)

Cover your dough with waxed paper and a towel. Let rise until it doubles in size (about an hour).

Shape loaves of bread into the size you want and place them in buttered loaf pans. (Our dough was so sticky, it could not be shaped, so I put it into a buttered loaf pan). If baking with eggs add them now. Cover with buttered wax paper and a towel and let rise until it doubles in size (we did not have room for it to rise to double its size). Brush the loaf with the egg wash (we call this painting).

Bake for an hour at 275 degrees.

Now when I took ours out after an hour, it was obvious it needed to be baked more. I put it in and two of the eggs slid out. Since our dough was too liquidy it took some of the color off the eggs. I would use the brown eggs if I repeated this.


However Hazel and I loved the bread. Steve did not. I ran out of white flour and used some whole wheat, so I think it is a bit browner than usual as well.


We also found some music on the following CD's.

For those homeschooling, looking at Portugal is a great time to look at the Age of Discovery and look at the explorers. There are many from Portugal.

Also available are the Portugal Placemat and Passport Pages. And of course check out all the posts shared for new recipes and ideas of looking at Portugal. Around the World in 12 Dishes is hosted by 

Adventures In Mommydom, Afterschool for Smarty Pants, All Done Monkey, Crafty Moms Share, Maroc Mama, Glittering Muffins, Kid World Citizen, Mermaids' Makings, The Mommy Talks and The Usual Mayhem

Feel free to share any Portuguese recipe, craft or post you have as well. Next month we will be visiting Croatia.

More Salt Dough Ornaments

We had a busy Saturday doing lots of fun things. We started with a small craft that I will share tomorrow. Then Hazel and I went to our church for a gingerbread man decorating fundraiser. Hazel had so much fun decorating them. I let her do two. We came home and had some lunch and of course no nap, and she and Mommy and Daddy really needed one, but when Daddy is home we often do not take one.

Then we made some salt dough ornaments. I used a different recipe this time. I wanted to make them like a play dough at first after seeing the post at The Magic Onions. I loved her idea of decorating them with glitter and just have it colored. I got to thinking if the cream of tartar makes the play dough last longer, does it need to be there. I did some research on line and then remembered I had a book, The Arts and Crafts Busy Book: 365 Art and Craft Activities to Keep Toddlers and Preschoolers Busy by Trish Kuffner, with an appendix full of such recipes. I was going to make a no-bake craft clay with cornstarch and baking soda, however to color it you added the food coloring in the beginning. Since I wanted to make two colors this wouldn't work. So I went with the Salt Clay recipe which is the same recipe you see everywhere. I used the method of mixing the dry ingredients that The Magic Onions suggested--the snow method. Hazel loved it!! Then we added the water and still mixed with our hands. At first Hazel didn't like it sticking to her hands but after I did it some she wanted to try some more. I thought I had added too much water at one point but kept kneading it and it became the perfect consistency. We divided it up into two parts and mixed in red in one and green in the other. 

The first rolling, after I got it pretty flat, we used one of Hazel's textured rollers to give stars on our ornaments. Then we cut them out. Used a straw to punch a hole in it and added some glitter.

The next ones we did not give texture by a rolling pin, but used some rubber stamps after we cut them out.  Overall, I love how they came out. We of course added some more glitter to the stamped ones as well and then we baked them for several hours.