Google+
Showing posts with label cooking. Show all posts

Sorbet Floats--Summer Celebrations or Perfect Drinks for a Frozen Party

Have you entered my current giveaway yet?
We are in the middle of Labor Day weekend here in the United States. It is the unofficial end to summer. Hazel starts school this week and she is not happy about it. To celebrate summer, say an end or just for fun, we made some sorbet floats. Now this idea started when we were out to dinner with my parents at the Rock Harbor Grill. We looked at the dessert menu after dinner even though none of us could eat another bite and I saw a blueberry sorbet IBC cream soda float. I was tempted, but then noticed all desserts were $8 and figured we could make it cheaper at home. I bought a six pack of IBC cream soda and then searched for blueberry sorbet. I finally found some in one of those serve yourself frozen yogurt places. We bought a small cup of it and made the floats.


Now since this was a summer celebration we used our umbrella straws. I could totally see Olaf drinking this in his dream of summer. Since we did not have much sorbet, we only needed one bottle of soda for the two drinks. Hazel loved it! (Now she has yet to like any of the drinks with bubbles in it previously.)
I finally got her to take the straw out of her mouth and told her to smile to show she liked it, but the smile didn't quite happen.
Now one of the best things of these floats is it is made with sorbet which is dairy free so Hazel can have them without worry of the dairy issues! We had some raspberry sorbet in the freezer, so we tried that the next day. We put in a lot of sorbet the first time we made them and not quite as much so it could have a chance to melt. We talked about the sorbet being like frozen hearts from Disney's Frozen. So we decided this would be a fun punch to make for her Frozen party. 


Hazel has been asking for these every night now. We are not quite as fancy as the first ones. Needless to say we love them. 


My favorite is when the sorbet is really starting to melt and you can taste the fruit mixed well with the soda. So that is our summer celebration/Disney Frozen inspired drinks. Goodbye, summer!! We will miss you!!

For more Frozen inspired things check out:

Around the World in 12 Dishes: Al Kabsa - Traditional Saudi Rice and Chicken

Make sure to enter my current giveaway!!

This month we are exploring Saudi Arabia. Since Hazel does not watch or hear news if we can help it, she does not know much about Saudi Arabia. There also was not much out there for her age on Saudi Arabia. We found a few picture books that were more on Islam. Since Islam's birthplace is in Saudi Arabia, I guess it is appropriate. I found a coloring page on Education.com.
For a bit more on Saudi Arabia, you can check out my post on the Around the World in 12 Dishes blog.


We found recipes on-line since none of the books we looked at had any. We decided to try Al Kabsa which is a traditional Saudi rice and chicken. We found the recipe on All Recipes. I have seen Hazel grow and develop in the kitchen over the past year. It is amazing to see what she can do now.

Al Kabsa adapted from All Recipes
Ingredients:
Kabsa Spice Mix:
1/2 teaspoon saffron
1/4 teaspoon ground cardamom
1/2 teaspoon ground cinnamon
1/2 teaspoon ground allspice
1/4 teaspoon ground white pepper
1/2 teaspoon dried whole lime powder or lime zest (we could not find dried whole lime powder)

1/4 cup butter
1 onion finely chopped
6 cloves of garlic
3 pounds of bone-in chicken cut into 8 pieces
1/4 cup tomato puree
Hazel zesting the lime
1 (14.5 ounce) can diced tomatoes
1 package shredded carrots
2 whole cloves
1 pinch ground nutmeg
1 pinch ground cumin
1 pinch ground corriander
salt and freshly ground black pepper to taste
3 1/4 cups hot water
1 chicken bouillon packet
2 1/4 cups unrinsed basmati rice (we used brown basmati rice and it took much longer!!)
1/4 cup of raisins
1/4 cup slivered almonds

Instructions:
1) Mix together the Kabsa Spice Mix in a small bowl and set aside.
Hazel adding tomato puree

2) Melt the butter in a large stock pot or Dutch oven over medium heat. Stir in the garlic and onion. Cook and stir until the onion turns translucent, about 5 minutes. 

3) Add the chicken, and brown them over medium high heat until lightly brown, about 10 minutes. 

4) Mix in the tomato puree, canned tomatoes, carrots, and all spices (including mix from step 1). Cook for about 3 minutes.
Stirring Mixture
Adding Water & Bouillon


5) Pour in the water and chicken bouillon (we mixed them together first since we use a no salt packet and not a cube). 
Waiting for it to boil

6) Bring sauce to a boil, then reduce heat to a simmer and cover the pot. Simmer until the chicken is no longer pink, about 30 minutes.

7) Gently stir in the rice. Cover the pot and simmer until rice is tender and almost dry, about 25 minutes for white rice and 35 for brown.
Hazel Adding Rice

8) Add the raisins and more hot water if necessary (ours definitely did not need any more water). Cover and cook for an additional 10 minutes or until rice is dry.

9) Transfer the rice to a large serving platter and arrange chicken pieces on top. Sprinkle the slivered almonds over the dish. Enjoy!


I enjoyed it and Hazel liked the chicken but thought the rice was too spicy. Steve thought it was ok, but really didn't want it again.


For books we read:

  •  Hajj Stories by Anita Ganeri which shares the story of the traditional Hajj, journey to Mecca for Muslims.
  • Ramadan Moon by Na'ima B. Robert and Shiria Adi which shares how Ramadan is determined by the moon and what Ramadan is.
  • We also have our Fairy Tales in Different Cultures from the past which include: The Golden Slipper, The Persian Cinderella, Cinderella: An Islamic Tale, Snow White: An Islamic Tale. We are looking forward to the Sleeping Beauty: An Islamic Tale coming out in February!!


That is our exploration of Saudi Arabia. Around the World in 12 Dishes is hosted by these lovely blogs:


Adventures In Mommydom, Afterschool for Smarty Pants, All Done Monkey, Crafty Moms Share, Glittering Muffins, Kid World Citizen, Mermaids' Makings, The Mommy Talks and The Usual Mayhem
I hope you will take the time to check them all out and check out everyone's great explorations of Saudi Arabia. If you have a Saudi dish or craft or lesson, please share it here as well!! The Saudi placemat and passport pages are coming soon for help with extra learning about the country.

Around the World in 12 Dishes: Exploring Ukraine through Food and Craft

With Ukraine in the news so much, it is a perfect time to explore the country through food, books and crafts. It is also a perfect time for lessons with older children about current events and such. Since we do not let Hazel know about current events or watch the news, we looked at tradition, food and crafts. 


Ukraine is a country in Eastern Europe and is the largest country that is entirely in Europe. For more information, read the introduction post at Around the World in 12 Dishes. I shared the books we have read and not read about Ukraine. Have you read Jan Brett's The Mitten? I know it is really popular around here and it is the retelling of a Ukrainian folktale.

 We decided to try two different Ukrainian recipes. The first we found in the Ukraine book of the Festivals of the World series.  It is written by Volodymyer Bassis (or Vladimir Bassis--all the sites seem to list both spellings). The recipe is for Strawberry Kysil. Kysil can be made with different berries, but Bassis claims strawberries make the best one.

Strawberry Kysil 
(from Ukraine by Volodymyer Bassis)
Ingredients:
2 quarts of fresh strawberries (I am sure you could use frozen)
2 cups cold water
3/4 cup sugar
1 tablespoon potato starch (we used tapioca starch since we could not find potato starch)

1) Wash and hull the strawberries. Put in pan with water and bring water to a boil. Boil on high for a minute then turn down to low and let simmer for 10-15 minutes. I let Hazel use the potato masher while the strawberries cooked to help get the juice out. This makes the next step a bit easier.

2) Push the strawberries through a fine mesh strainer with a wooden spoon. Put juice back in pan.

3) Stir in sugar and bring back to a boil. Boil over high heat for 2 minutes.

4) Reduce heat to medium and stir in starch and dissolve it (Hazel did not do a good job of dissolving our starch so we have chunks in it). Cook for another 2 to 3 minutes stirring until it thickens. 

5) Cool to lukewarm and then put in refrigerator to get cold for a few hours. Enjoy!


Strawberry Kysil is a bit like strawberry soup or eating a liquid form of strawberry jelly. It is delicious but you will not want to much at one time.

Our second recipe came from Ukrainian Classic Kitchen and International Cuisine and it is Ukrainian Yabluchnyy Korzh. Hazel likes to call it what it tastes like--apple pie. It is a type of cookie crust with apples inside. It is delicious!

Ukrainian Yabluchnyy Korzh
Adapted from Ukrainian Classic Kitchen and International Cuisine
Ingredients
Dough:
5 cups of flour
1 teaspoon baking powder
3/4 teaspoon salt
1 cup sugar
1 cup unsalted butter, cut into small pieces
6 large egg yolks (if I made again I would use whole eggs)
1 cup sour cream

Filling:
7-8 large apples (we used Granny Smith)
1/2 cup sugar
1 teaspoon ground cinnamon

Start by making the dough:
1) Stir together flour, baking powder, salt, and sugar. then add the butter and mix with your hands (Hazel loved this part) to make a coarse flaky mixture. 

2) In a small bowl mix egg yolks and sour cream together. Then add it to the dry ingredients. Work it with your hands into a firm, smooth, not sticky dough. (Ours never really formed a good firm smooth dough.)

3) Divide dough into 2 pieces, making one slightly larger than the other. 

4) Turn oven on to 375 and grease with butter (we used the wrappers) a 13 x 9 x 2 baking pan. Do not use baking spray to grease.

5) With the larger dough, cover bottom and sides of pan. The instructions say to roll it out, but I found ours was just too crumbly to do this. I pressed it into the pan.

6) Time to start filling. Peel and thinly slice the apples (we used our food processor). Mix with sugar and cinnamon.

7) Add apple mixture to bottom crust.

8) Roll out top crust or pat it on top. Try to seal apples in.

9) Bake for 45 to 55 minutes. It should be brown in color and the apples should be tender to a knife. Set on wire rack to cool for 20 minutes.

10) Now you can attempt to remove the pan (I did not attempt due to the crumbly nature). To remove: Run a sharp knife along the sides and then put a wire rack on top and flip it over. Remove pan and put other wire rack on bottom and flip back the correct way.

11) Serve at room temperature. You can dust it with powdered sugar (we didn't bother). Refrigerate leftovers but bring to room temperature before eating.


Since it tastes similar to apple pie (Steve's favorite dessert), we all love it!

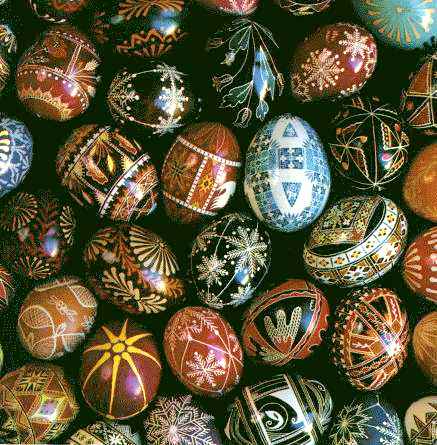
We also have been reading Urkainian stories. We found a Cinderella tale, The Golden Slipper, which we shared last week. We also found many versions of a Christmas tale involving spiders. All the crafts I could find had to do with spiders as Christmas ornaments or pysanky (Ukrainian Easter eggs).
Ukrainskie pisanki
Pysanky Source: By Carl Fleischhauer (Library of Congress employee[1]) 
(http://www.loc.gov/folklife/cwc/) [Public domain], via Wikimedia Commons
Since we already posted about pysanky, we made a silver spider web and spider Christmas ornament. We found the instructions in Christmas Crafts from Around the World by Judy Ann Sadler. 


In the Christmas legend, the spider on a Christmas tree spins webs of silver for a poor family who has no money for Christmas. Thus why the ornament is done in silver!
Ukraine's Flag
Now it is time for the Around the World in 12 Dishes Blog Hop! Please visit the other posts and feel free to share any Ukrainian crafts, food, etc. posts that you have done.


Fruit Explorations: Limes: Making Raspberry Lime Rickeys!

Have you entered my current giveaway yet?

Since limes were on sale this week, I picked a few up and thought it would be fun to explore them since our last exploration was on lemons. Hazel also found a fun treat drink at a coffee/ice cream shop near my parents which is a raspberry sorbet lime rickey. She loves them, so I thought raspberry lime rickeys would be fun to make.

Hazel explored the limes first on the outside. She described them as green a slightly bumpy.


 Then I cut it in half for her and she explored the inside. Green and smooth and bumpy is her description. Then she liked a piece of it and I wish I could have gotten a picture of her face. She said it was too sour. 


Then I started zesting some limes for our recipe and Hazel was in charge of getting the juice.


Hazel discovered that it is harder to juice limes than lemons. After she got tired of juicing, I gave her some zest to investigate.


Finally we had enough zest and juice to make our Raspberry Lime Rickey Recipe. We started with the recipe at Mel's Kitchen Cafe: Raspberry Lime Rickey. Here is what we did.

Ingredients:
10 oz. bag of frozen unsweetened raspberries
2 cups sugar
1/2 cup water
1/2 cup lime juice (3-4 limes)
zest from 3 limes
chilled club soda
ice

To begin, mix the raspberries, sugar and water in a pan over medium heat for about 5 minutes. Then using a potato masher, mash the raspberries the best you can.


Put pan back on stove and mix in lime juice and zest. Bring mixture to a boil for a couple of minutes. Remember to stir often so it doesn't burn. Remove syrup and push it through a fine mesh strainer with a bowl underneath to remove raspberry seeds and any solids. 

Refrigerate the syrup to cool.

To make a raspberry lime rickey, mix 3/4 cup of club soda with 3 tablespoons of the syrup in a glass with ice.


I loved them. Steve said they were all right, but didn't drink his and Hazel liked the ones with the sorbet better. So the next day I bought some raspberry sorbet. I put the entire pint in the blender with just over two cups of club soda and around 1/2 cup of the syrup (and then I added more after my first taste). I blended it all together and poured it into three travel cups since Hazel was at her grandmother's house. Hazel liked this one much better!


That is our lime exploration! I hope you will join us for our next fruit exploration!

If you would like to see more of our posts about fruit check out:

Mei-Mei's Lucky Birthday Noodles Book Review

Have you entered my current giveaway yet?
Disclosure: Tuttle Publishing gave me a copy of these books free of charge. All opinions in my review are my own and I did not receive any other compensation. As in all my reviews I am providing links for your ease, but receive no compensation.

Today I get to review a wonderful book that is being released later this summer. The book is called Mei-Mei's Lucky Birthday Noodles written by Shan-Shan Chen. The book has beautiful illustrations by Heidi Goodman. I find all the books  from Tuttle Publishing so beautifully put together in the stories, illustrations and quality. It is rare that I call books beautiful, but these books really are.

This wonderful story is about Mei-Mei and her birthday. Her day starts by her going into her parents' bedroom to wake them up. They immediately wish her a happy birthday. They both talk about how her birthday is an extra special day since it was the day they were able to bring her home from China. As parents who adopted this young girl this day meant so much to them and you can feel their love for her through the story. Mei-Mei asks her mother about making her lucky birthday noodles. Her parents have been trying to keep some of her Chinese traditions so Mei-Mei will know them. One is making lucky birthday noodles. Mei-Mei and her mother get to work chopping and cooking. There are mushrooms, green onions, carrots and bok choy to chop. The beef has to be sliced. Then the wok is pulled out to start the cooking. 


Mei-Mei asks questions about many things having to do with the noodles and her mother is able to tell her some of the Chinese cultural beliefs. As a result the reader learns them as well. This story is a wonderful book for someone wanting to learn about the Chinese culture as well as a book for any child who is adopted. The book ends with a recipe to make the lucky birthday noodles. We of course had to try the recipe. I made it for dinner the other night. Hazel was too busy enjoying her wading pool to help. (Our air conditioner was broken, so she needed to cool off anyway.) It was an easy recipe and both Steve and I loved it. Hazel thought it had too many vegetables and I think she really meant too much bok choy, which she does not like. She however loved the beef that was in it.


And yes, Hazel and I ate the noodles with chopsticks to make it truly a Chinese experience. This amazing book is being released on August 26th. You can pre-order it at Tuttle, Amazon, and Barnes and Noble.

For more Chinese books, crafts, etc. check out:

Fruit Explorations-- Lemon

Have you entered my current giveaway

Ok, we did this exploration on Friday, but I did not get the post written, so you get it today. Hazel has been asking for more fruit explorations, and I thought about lemons and making lemonade. Summer officially started today and what is better on a hot day than a cool glass of fresh-squeezed lemonade? So Thursday Hazel and I went to the store and bought some lemons in two sizes--regular or jumbo.

She could not wait to get started, so we did our exploration in our pajamas. She used a new magnifying glass to examine the outside and then I cut one in half for her.

After examining the inside as a half she asked me to cut the half in half so she could see the center better. 

She had fun examining it. She tasted a lick of one piece, but did not like it. Then she started squeezing them for the juice.

When I researched lemon crafts I discovered this neat one at Teach Preschool: Lemon drop painting.The idea is to dissolve lemon drops in a little bit of warm water to make a paint. Since we did not have lemon drops, we tried lemon lifesavers and had no success. Then we found some lemon hard candies and added them, but again no luck. We decided to add some lemon peel, so I made some zest. Hazel of course asked to have some to examine as well.
After our failure with non-lemon drop painting, we pulled out the yellow paint and got creative. Hazel made lemon prints with the half rinds.


Hazel even managed to find one that had a bit of the inside structure left and got some interesting prints. Then she wanted to paint the lemon, so she had fun painting as well.

Now we stopped painting to make the syrup and the rest of the lemonade. She had squeezed about one cup of lemon juice, so we mixed one cup of water with one cup of sugar in a saucepan and Hazel stirred it until the sugar dissolved. Then we heated it to a boil to keep the sugar dissolved.

Then we let it cool for a bit. Finally we mixed the lemon juice, syrup and about three and a half cups of water in a pitcher.


We put it in the refrigerator for at least thirty minutes. We did a little more since we went back to painting. I pulled out a small square colored canvas and started painting a lemon on it. Hazel was suppose to paint the inside of it, but got upset since she thought my lemon looked better than hers. She started over and told me to paint the lemon's inside. 

Since my lemon did not fill the canvas enough, I made a lemon print and painted the inside of the lemon. then I added some strawberries to fill the canvas better. I started painting the strawberry seeds white, but was informed they are yellow. While finishing my painting we enjoyed the lemonade. Then while I cleaned up, Hazel drew in her fruit journal.


Since I had not planned ahead enough, I did not get any books on lemons yet, but will share some with you sometime soon. I also have the song Lemon Drops and Gum Drops in my head from searching the library database for lemon. Hazel learned the song and sang it at school in two concerts. I was singing it all Friday morning.  Hazel has also asked to explore all the fruits again. Stay tuned!!

For more fruit ideas check out: